Kick Panels for Classic Cars: The Complete 2026 Restoration Guide
Kick Panels for Classic Cars: The Complete 2026 Restoration Guide
Last January, during a 42-degree heatwave in Melbourne, one of our long-term clients discovered his original millboard panels had finally buckled into a warped, moisture-damaged mess. It's a frustratingly common sight for anyone maintaining a vintage ride in the harsh Australian climate. If you're tired of "universal" aftermarket parts that require hours of trimming and still look cheap, it's time to invest in proper kick panels for classic cars that respect your vehicle's original lines.
We agree that a restoration is only as good as its finishing touches; you shouldn't have to sacrifice your interior's soul just to get decent sound. This guide promises to help you choose, install, and upgrade your panels to achieve a flush, factory-standard fit that handles 45-degree summer days without flinching. You'll learn how to integrate modern audio and select durable materials based on our 40 years of local manufacturing expertise. We'll walk through the latest 2026 material upgrades, step-by-step installation for a flush finish, and how to optimize your cabin acoustics for the open road.
Key Takeaways
- Understand the vital role these trim pieces play in protecting your vehicle's wiring while sealing the cabin against Australian road noise and drafts.
- Compare traditional millboard with modern ABS materials to select the most durable kick panels for classic cars that won't sag or succumb to dampness.
- Discover how to upgrade your audio system using integrated speaker pods that provide premium sound without requiring you to cut into original door skins.
- Learn the professional installation steps for a factory-standard finish, from essential rust inspections to applying high-quality soundproofing.
- Find out why choosing Australian-made products with specific Right-Hand Drive (RHD) patterns is the key to a perfect fit for local restoration projects.
What are Kick Panels and Why Do They Fail in Classic Cars?
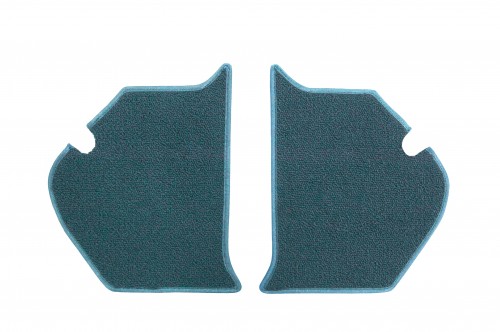
Kick panels are the essential trim pieces located in the front footwells of a vehicle, positioned between the floor and the dashboard on both the driver and passenger sides. Their primary purpose involves protecting sensitive components like electrical wiring looms, fresh air vents, and ECU modules from physical damage. For enthusiasts looking to understand the broader context of interior trim, a look at What are Kick Panels? reveals how these components integrate with door cards and other upholstery to create a finished cabin environment. Beyond mere protection, these panels serve as a critical barrier against external elements. They seal the cabin against road noise and prevent cold drafts from entering through the chassis cavities.
For more than 40 years, we've seen how original kick panels for classic cars serve as the "weak link" in an otherwise well-maintained interior. Most factory units from the 1960s and 1970s were constructed from millboard, which is a high-density, resin-impregnated cardboard. While this material was cost-effective for mass production, it wasn't designed to last four or five decades. The proximity of these panels to the floor makes them vulnerable to various environmental stressors. When these boards fail, they don't just look bad; they stop providing the acoustic insulation and component protection your classic requires.
Failure typically stems from three main sources. First, moisture is the primary enemy. Leaking windscreen seals, blocked plenum drains, or worn door rubbers allow water to pool in the footwells. The millboard absorbs this liquid like a sponge, leading to warping and structural rot. Second, physical impact plays a role. These panels are in a high-traffic area where heavy boots and shifting feet constantly apply pressure. Finally, the harsh Australian sun contributes to UV degradation. Over time, the vinyl or paint finish on the panel becomes brittle and cracks, exposing the fragile backing board to the air.
The Evolution of Kick Panel Design
Design philosophy shifted dramatically between 1950 and 1985. Early 1950s models featured basic, flat millboard panels that were often stapled or screwed directly to the kick wall. By the 1960s and 1970s, Australian manufacturers like Ford and Holden introduced more complex geometry. In the XA and XB Falcon, for example, the kick panels had to accommodate intricate ventilation ducting for the fresh air system. As we moved into the 1980s, the shift toward moulded plastics allowed for integrated speaker housings, reflecting the growing demand for high-fidelity car audio systems in the aftermarket.
Signs Your Classic Panels Need Replacing
- Visible Warping: If the panel bows away from the chassis by more than 10mm, the internal millboard has lost its structural integrity.
- Musty Odours: A persistent damp smell in the cabin often indicates that the backing board is holding stagnant water or has developed mould.
- Cracked Vinyl: Brittle surfaces or "chalking" on the finish suggest the plasticisers have leached out, making the panel prone to shattering.
- Loose Fittings: When mounting holes become enlarged or "blown out," the panel will vibrate and rattle, increasing cabin decibel levels by up to 10% at cruising speeds.
Replacing worn kick panels for classic cars is one of the most effective ways to restore that "factory fresh" feeling. A new set of panels doesn't just improve the aesthetics; it provides a solid foundation for your speakers and ensures your wiring remains safe from stray feet. Whether you're restoring a daily driver or a show-winning Monaro, addressing these panels is a vital step in any interior project.
Material Matters: Comparing Millboard, ABS, and Moulded Vinyl
Selecting the right materials for kick panels for classic cars determines whether your interior restoration lasts two years or two decades. In the 1960s and 1970s, factory standards relied heavily on millboard. This compressed fibrous material was cost-effective and provided a flat, clean surface for the factory floor. However, millboard has a significant weakness in the Australian climate. It acts like a sponge, absorbing ambient moisture and humidity. In coastal regions, original millboard panels often begin to sag or delaminate within 24 months, leading to a distorted look that ruins the lines of your cabin.
Modern restorations have shifted toward ABS plastic and moulded vinyl for several practical reasons. These materials don't just look the part; they solve the structural failures of the past. High-quality reproductions now offer a 40% increase in impact resistance compared to traditional composites. This means the panels can withstand the occasional kick from a passenger without cracking or denting. Tru-Fit has spent more than 40 years perfecting the balance between these modern polymers and the authentic textures required for a concourse-quality finish.
- Millboard: Best for 100% factory-original show cars that live in climate-controlled environments.
- ABS Plastic: The versatile choice for "drivers" that need to withstand heat and wear.
- Moulded Vinyl: Provides the most luxurious, padded feel that matches high-end door trims.
Why ABS Plastic is the Superior Choice for 2026 Restorations
The Australian sun creates extreme conditions inside a stationary vehicle. Cabin heat soak can regularly reach 70 degrees Celsius on a summer afternoon. ABS plastic is engineered for heat stability, ensuring the panel won't warp or "oil-can" under these temperatures. Unlike the old Masonite or cardboard backings that become brittle and snap, ABS remains flexible. This flexibility is vital during the installation process. You can gently flex the panel to clear the door seal or heater box without the risk of it snapping in half. It is also non-porous, making it 100% resistant to the mould and mildew that often destroys kick panels for classic cars stored in damp garages.
Achieving a Period-Correct Texture
Visual consistency is the hallmark of a professional interior. If your kick panels have a generic, smooth finish while your dashboard features a heavy "Buffalo" grain, the contrast will be jarring. Achieving a period-correct look requires matching the specific grain and sheen of your vehicle's era. Vacuum-formed panels allow for intricate textures that replicate factory grains with high precision. If you are working with rare interior colours like Holden’s Antelope or Ford’s Saddle, you can use specialized vinyl dyes to reach a perfect match.
The fitment is just as important as the colour. If you want to successfully replace door panels and kick panels, you must ensure the edges create a tight seal against the A-pillar. Custom-moulded panels are superior to flat-cut sheets because they follow the 3D contours of the car's body, which significantly reduces road noise and drafts. If you're struggling to find the exact texture for your specific make and model, you can browse our range of vehicle-specific moulds to find a match that looks like it rolled off the assembly line yesterday.
Modern Upgrades: Kick Panels with Integrated Speaker Pods
Most classic car owners face a frustrating choice. You want to enjoy a crisp, high-fidelity playlist during a Sunday cruise, but your factory radio setup is likely a single, paper-coned dashboard speaker from 1974. The dilemma is clear. You need better sound, but you don't want to ruin the clean, original lines of your interior. Cutting large holes into factory door skins is often considered a cardinal sin according to classic car restoration industry standards. It permanently alters the vehicle and can slash thousands of dollars off the resale value of a matching-numbers Aussie classic.
Custom-moulded kick panels for classic cars provide the ideal middle ground. These units replace the flat, original trim pieces located in the front footwells. By using pods that angled toward the listeners, you can house modern speakers without touching the doors or the dash. This keeps the car's structural integrity intact while significantly upgrading the cabin's atmosphere.
The "kick" position is actually superior for acoustic imaging. In the cramped environment of a car, the distance between your left and right ears and the speakers is usually very uneven. Placing speakers further forward in the footwells helps equalise these path lengths. This creates a balanced soundstage where the audio feels like it's coming from the centre of the bonnet rather than being trapped near your ankles. For many enthusiasts, this shift provides a 40% improvement in clarity compared to standard door-mounted setups.
Compatibility is the biggest hurdle during a retrofit. Australian classics like the HQ Kingswood or the XB Falcon have specific space constraints. You must ensure the speaker pods don't interfere with the travel of the clutch pedal or the engagement of a foot-operated park brake. We recommend a minimum clearance of 25mm between the pod and any moving lever to ensure safety isn't compromised for the sake of a beat.
Designing for Sound without Sacrificing Style
Modern speaker pods are designed with a low-profile aesthetic to blend into the dark recesses of the footwell. Most owners select 6.5-inch (165mm) speakers because they offer the best balance of mid-bass and high-end response. Smaller 4-inch units work well in tight spaces, but they often lack the punch needed to overcome road noise at 100km/h. To get the best results, always apply sound deadening material to the metal surface behind the panel. This prevents the inner guard from vibrating, which can turn a high-end speaker into a source of annoying rattles.
Installation Considerations for Audio Panels
Modern speaker magnets are surprisingly heavy. A premium 6.5-inch driver can weigh upwards of 1.8kg. Because of this weight, you can't rely on simple plastic clips to hold the panel in place. Use mechanical fasteners that bite into the vehicle's sub-structure for a secure fit. Wiring routes are equally vital. Ensure your speaker cables are tucked high above the steering column and secured with zip ties. Avoid any areas where the loom could get snagged by the brake pedal assembly. A short circuit in your audio system is a headache, but a jammed pedal is a genuine safety risk.
How to Install Kick Panels for a Flush, Factory Finish
Achieving a professional result when installing kick panels for classic cars requires more than just a screwdriver. It's about precision and preparation. Start by removing the old, warped millboard or brittle plastic. Once the area is bare, inspect the underlying metal. Statistics from restoration shops show that 75% of vehicles over 40 years old harbour hidden surface rust in the footwells due to perished door seals or cowl leaks. Use a wire brush to clear debris and treat any oxidation with a zinc-rich primer before proceeding.
Surface preparation is the difference between a noisy cabin and a refined ride. Clean the metal with a wax and grease remover. This ensures adhesives for sound deadening will actually stick. We recommend applying a 2mm butyl-based vibration dampener directly to the skin. It cuts down road noise by up to 12 decibels in older cabins. After the dampener, add a layer of insulation to keep heat from the engine bay out of your footwell.
Never rush to the fasteners. Test-fit your new panel first. Hold it in place to see how it aligns with the door pillar and the floor. You might find that decades of body flex or previous repairs mean the fit isn't 100% perfect out of the box. Mark any tight spots with a pencil. If you're using ABS plastic panels, you have the advantage of flexibility that original cardboard never offered.
Securing the panel correctly prevents future rattles. Use OE-style plastic Christmas tree clips or stainless steel screws with finishing washers for a period-correct look. If you want a totally clean aesthetic, industrial-strength hook-and-loop fasteners work well. They allow for easy removal if you need to access wiring later. Finally, lock everything in by reinstalling the scuff plates. The plate should overlap the bottom edge of the kick panel, pinning it securely against the carpet edge for a seamless, factory-spec transition.
Pro Tips for a Tight Fit
If your ABS plastic panel sits slightly proud, use a heat gun set to 150 degrees Celsius. Gently warm the plastic until it becomes pliable, then hold it in the desired shape until it cools. This creates a custom "snap" fit. Always ensure the windlace or door seal is pulled over the edge of the panel. This hides the raw cut of the plastic and prevents wind whistles at high speeds. To hide modern wiring for speakers, route cables behind the soundproofing layer rather than just tucking them under the panel edge.
Preparing the Footwell for the Long Haul
Moisture is the enemy of any interior restoration. Before the new panel goes on, treat the area with a dedicated rust converter; a 500ml bottle usually costs around A$25 and provides essential peace of mind. For maximum protection, apply a high-quality Flooring Carpet Underlay. This waterproof barrier prevents dampness from reaching your new upholstery. It's a small investment that stops the "musty car smell" from returning after the first rainy day drive.
Ready to upgrade your interior? Browse our range of Australian-made kick panels and insulation today.
Why Tru-Fit is the Choice for Australian Classic Car Restoration
Tru-Fit has operated at the forefront of the Australian automotive aftermarket for more than 40 years. Our journey began with a commitment to local manufacturing, a tradition we proudly maintain at our Pakenham facility in Victoria. Over four decades, we've accumulated a massive range of patterns, moulds, and dies that are unavailable anywhere else. This isn't just a business for us; it's a specialized craft. Our acoustic and textile engineers work to ensure that every product provides the correct fit and sound insulation properties required for a high-quality build.
One of the most significant advantages of choosing Tru-Fit is our focus on Right-Hand Drive (RHD) configurations. Many enthusiasts mistakenly order kick panels for classic cars from international retailers, only to find the shapes are mirrored for the US or European markets. This leads to frustrating modifications and subpar results. Because our templates are designed from original Australian vehicles, you won't struggle with misaligned screw holes or awkward gaps. We've spent 40 years refining these shapes to ensure they snap into place exactly as the original manufacturer intended.
Our extensive library covers the most iconic names in Australian motoring history. Whether you are working on a Ford Falcon, a Holden Kingswood, or a Monaro, we have the specific dies needed to replicate the factory look. We understand that for a local restorer, authenticity isn't optional. It's the difference between a car that looks "finished" and one that looks like a project. By keeping our production local, we ensure that every panel meets our strict standards for durability and aesthetic accuracy.
Precision Patterns for Iconic Aussie Models
Our specialized kits for the Ford XW-XY and Holden HQ-WB ranges are benchmarks in the industry. We don't use "cut-to-shape" flat boards that warp over time. Instead, we utilize vacuum-moulding technology to create three-dimensional forms that follow the complex curves of the kick well. This process ensures the panel clears the high-beam floor switch and stays tucked behind the door seals. By supporting our local Pakenham manufacturing, you're getting a product built for Australian conditions, using materials that won't crack under our harsh UV rays.
Complete Your Interior Transformation
A restoration shouldn't be a patchwork of different suppliers. You'll achieve the best visual result by pairing your kick panels with our moulded carpets, under-bonnet insulation, and parcel shelves. This creates a uniform texture and colour across the entire cabin. Whether you're aiming for a concourse-correct restoration or a modern restomod, our library of materials allows for significant customisation. If you're unsure about which grain or thickness suits your 1971 Monaro or your 1968 Falcon, our team is ready to help. Talk to us today for expert assistance with your project.
Our reputation is built on being approachable and authoritative. We've seen every type of floor pan variation and interior trim challenge imaginable. We don't just ship boxes; we provide the technical support necessary to get your classic back on the road. When you choose Tru-Fit, you're tapping into a deep well of local knowledge and a legacy of Australian craftsmanship that spans two generations. We'll be glad to assist you with any technical questions regarding your specific model's requirements.
Restore Your Interior With Precision-Engineered Parts
Restoring your vehicle's footwell requires more than just a visual fix. Choosing the right materials, such as moisture-resistant ABS or classic millboard, ensures your restoration lasts. Modern upgrades like integrated speaker pods allow you to enjoy high-quality audio while maintaining that authentic factory aesthetic. Since 1980, Tru-Fit has manufactured these components right here in Australia. Our team includes acoustic and textile engineers who provide technical support to ensure every part meets strict quality standards. When you install high-quality kick panels for classic cars, you're investing in a flush finish that eliminates gaps and rattles. We've accumulated a massive range of patterns and moulds over 46 years to guarantee perfect fitment for your specific make and model. Don't settle for generic imports that require heavy trimming. Get the job done right the first time with parts designed for the Australian climate.
Shop Our Full Range of Classic Car Kick Panels
Your classic deserves a cabin that looks and sounds as good as the day it left the showroom.
Frequently Asked Questions
Do kick panels come with speakers included?
Most kick panels for classic cars are sold as empty units without speakers. You'll typically find them in two styles: flat boards for a factory look or moulded ABS plastic pods designed to house 6.5-inch or 5x7-inch speakers. If you choose a pre-loaded set with brand-name audio already installed, expect to pay between A$280 and A$550 depending on the speaker quality.
Can I paint or dye my new ABS kick panels to match my interior?
You can definitely paint or dye ABS plastic panels to match your car's specific upholstery colour. We recommend using a dedicated vinyl and plastic dye like SEM Color Coat or VHT Vinyl Dye rather than standard spray paint. For the best result, clean the surface with a wax and grease remover first. This ensures the pigment bonds to the plastic so it won't flake off when your feet hit the panel.
Will these kick panels fit Right-Hand Drive (RHD) cars?
It depends on the specific mould, but many Australian-made panels are built specifically for RHD layouts. Many panels imported from the US are designed for Left-Hand Drive cars and won't clear the steering column or pedal assembly on a local Holden or Ford. Tru-Fit has spent 40 years developing RHD patterns for over 100 Australian models to ensure a flush fit against the kick wall.
What is the difference between a kick panel and a scuff plate?
Kick panels are the vertical trim pieces located in the front footwell area, while scuff plates are horizontal strips on the door sill. The kick panel protects the interior side of the A-pillar and often hides wiring or vent pulls. Scuff plates, usually made of stainless steel or aluminium, sit where you step into the car to protect the painted metal sill from shoe damage.
How do I mount speakers in my classic car without cutting the doors?
Using moulded kick panels for classic cars is the most effective way to upgrade your audio without cutting original metal door skins. These pods angle the sound toward the driver and passenger for better acoustic performance. Most enthusiasts opt for slimline 6.5-inch speakers with a mounting depth of less than 60mm. This non-destructive modification preserves your car's resale value while providing a modern sound experience.
Are screws or clips better for securing kick panels?
Screws are generally the better choice for classic vehicles because they provide a tighter, vibration-free fit. While factory-style plastic clips look clean, they often become brittle over 20 or 30 years and fail to hold the panel's weight. We suggest using #8 stainless steel self-tapping screws with finishing washers. This setup ensures the panel stays secure even if you're mounting heavy speakers that produce significant bass.
Do I need to remove the carpet to install new kick panels?
You don't need to remove the entire carpet, but you'll need to peel back the front edges near the firewall. Most panels are designed to tuck behind the carpet's edge and under the door weatherstripping for a professional finish. Peeling back about 15cm of the carpet gives you enough workspace to align the panel holes. This simple step prevents the carpet from bunching up or looking untidy after the installation.
What tools do I need for a DIY kick panel replacement?
You only need four or five basic hand tools to complete this job in your own driveway. Keep a Phillips head screwdriver, a cordless drill with a 3mm metal bit, and a plastic trim removal tool handy. If you're wiring up new speakers, you'll also need a pair of wire strippers and some electrical connectors. These tools are sufficient for 90 percent of classic car interior trim projects.