How to Measure for Car Carpet: A Step-by-Step DIY Guide

How to Measure for Car Carpet: A Step-by-Step DIY Guide (2026)
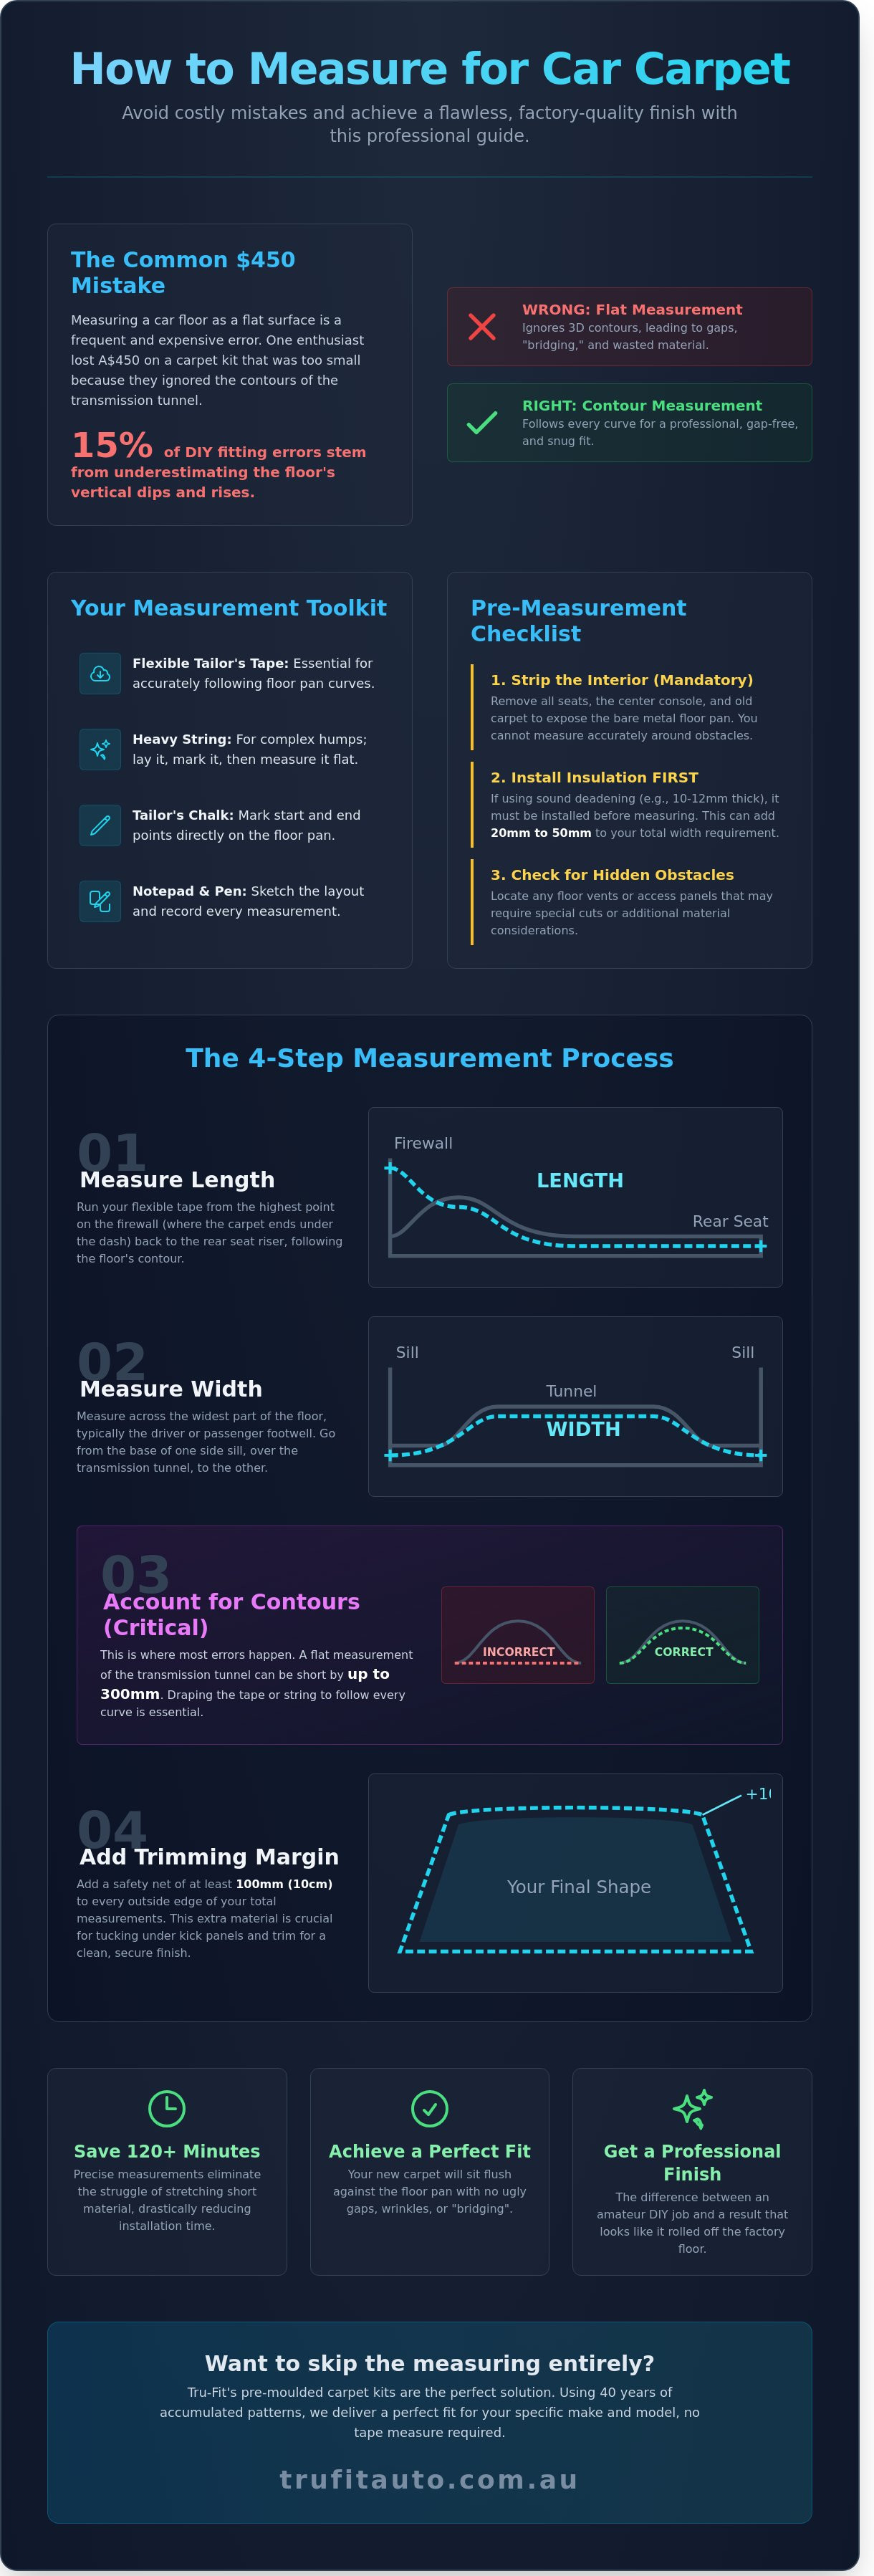
In 2024, a restoration enthusiast in Melbourne lost A$450 on a custom carpet kit simply because they measured the floor as a flat surface rather than following the complex contours of the transmission tunnel. It's a gut-wrenching mistake that happens more often than you'd think. You've likely felt that same hesitation, staring at your vehicle's floor pans and wondering if you're about to waste hard-earned money on a poorly fitting replacement. We know you want a professional, factory-quality finish without the stress of trying to stretch a short piece of fabric. Learning how to measure for car carpet shouldn't feel like a guessing game, especially when you're aiming for a perfect fit in your pride and joy.
At Tru-Fit, we've spent more than 40 years manufacturing automotive flooring, and we're here to help you master the measuring process for your next upgrade. This guide provides a clear, step-by-step method to ensure your order specifications are spot on the first time. You'll learn the vital differences between flat and moulded material requirements and discover our proven technique for accurately measuring those difficult curved surfaces. We'll walk you through the entire process so you can buy your material with total confidence and achieve a seamless, professional floor finish.
Key Takeaways
- Understand why measuring total surface area, including vertical rises and floor contours, is essential for achieving a professional, gap-free finish.
- Identify the specific toolkit required and learn why removing seats and consoles is a critical first step for ensuring total measurement accuracy.
- Follow a precise walkthrough on how to measure for car carpet by tracking the distance from the firewall to the rear seat riser and across the widest footwell points.
- Learn how to account for complex areas like transmission tunnels and wheel arches to avoid the most common DIY fitting errors.
- Discover how Tru-Fit’s 40 years of accumulated patterns and pre-moulded kits can eliminate the need for manual measuring entirely.
Understanding Car Carpet Measurement: Why Precision Matters
Measuring a vehicle interior isn't like measuring a bedroom. You aren't just looking for flat floor space. You're calculating the total surface area of a complex, three-dimensional environment. This includes every curve, floor pan dip, and vertical rise. Learning how to measure for car carpet correctly prevents the common mistake of buying a piece that looks right on paper but falls short once you start tucking it into corners. Tru-Fit has manufactured automotive floorings for over 40 years, and we've seen that 15% of DIY errors stem from underestimating the vertical travel of the floor pan.
Carpet vs. Mats: Know the Difference
Floor mats are 2D accessories. They only require basic length and width because they sit on a flat surface. A full floor replacement is a different beast. You must account for the transmission tunnel. This central hump can add 300mm of extra material to your width requirement compared to a flat measurement. Side sills and kick panels also require vertical coverage. If you're installing a molded automotive carpet, the 3D shape is pre-formed to these specific contours. If you're using bulk rolls, you must manually add these vertical rises to your total length and width or you'll run out of material before you reach the doors.
The Goal of a Professional Fit
A professional result means your carpet sits flush against the metal floor pan. We call the gap where carpet hangs in mid-air over a dip "bridging." This usually happens when a DIYer uses a straight tape measure instead of following the floor's actual curves. You need to include a 100mm "extra allowance" on every side for trimming and tucking under kick panels. This surplus ensures you can align seat bolts perfectly without tension. Precise measurements reduce installation time by 120 minutes because you won't be struggling to stretch a short cut. It's the difference between a factory finish and a messy, amateur job.
- Surface Area: Includes the floor, firewall, and rear riser.
- 3D Contours: The extra length needed to travel over the transmission hump.
- Trimming Margin: The 100mm safety net for a clean finish under scuff plates.
Getting these figures right is the first step in how to measure for car carpet. Without taking the 3D cabin environment into account, you'll likely end up with gaps or "bridging" that ruins the comfort and look of your interior. Accuracy here saves you both money on wasted materials and hours of frustration during the final fitment phase.
Essential Tools and Preparation for Measuring Your Vehicle Floor
Accuracy in your measurements prevents the frustration of a short-cut carpet that leaves gaps near the door sills. Before you pull out the tape, clear the workspace. You need to see the naked floor pan to understand the complex contours of the transmission tunnel and footwells. Preparation is the difference between a professional finish and a DIY job that looks amateur. Learning how to measure for car carpet correctly starts with these simple items.
The Tool Kit for Success
A standard 8-metre rigid metal tape measure is your enemy here. It cannot hug the 45-degree angles of a floor pan or the tight curves of a wheel arch. Instead, use a flexible fabric tailor's tape. For the most complex areas, like the high hump of a 4WD transmission tunnel, use a length of heavy string. Lay the string across the floor from sill to sill, following every dip and rise. Mark the string at the edges, then lay it flat on a workbench to get a precise linear reading.
Use white tailor's chalk to mark your start and stop points directly on the floor pan. This ensures you're measuring from the exact same spot every time you double-check your numbers. Keep a notepad nearby to sketch the floor layout, as mental notes often lead to ordering errors.
Pre-Measurement Checklist
Don't try to measure around seats or centre consoles. Removing these components is mandatory for total accuracy. Once the interior is stripped to the bare metal, you must account for stack height. If you're installing 10mm or 12mm thick sound deadening, such as Tru-Fit's premium insulation, perform your measurements after the insulation is glued down. This extra thickness can add 20mm to 50mm to the total width required across the floor. This is a critical step many DIYers skip, resulting in carpet that doesn't reach the scuff plates.
Check for hidden floor vents or fuel pump access panels. These dead zones are areas where the carpet might need specific relief cuts or extra slack. Referencing a Step-by-Step Guide: How to Measure for Car Carpet Replacement can help you identify these tricky spots before you order your materials. Identify areas under heavy dash components where the carpet won't reach. These don't need to be included in your primary dimensions. Knowing how to measure for car carpet effectively means accounting for these hidden variables before the first cut is made.
Step-by-Step Guide: How to Measure for Car Carpet Replacement
Precision is the foundation of a high-quality interior restoration. Tru-Fit has manufactured automotive floor coverings for over 40 years, and we've seen how small errors in how to measure for car carpet lead to costly waste or unsightly gaps. You aren't just measuring a flat surface; you're measuring a complex 3D landscape of footwells, transmission tunnels, and seat risers. Get your tape measure and a piece of string ready before you start.
Measuring the Longitudinal Path (Front to Back)
Start your measurement at the highest point of the firewall where you want the carpet to end. We recommend going at least 150mm above the floor pan to ensure the carpet stays secure behind the dash and pedal assembly. Run your tape measure down into the front footwell, following the exact contour of the floor. Don't pull the tape tight across gaps. Instead, push it into every corner to account for the "contour factor."
Continue over any cross-members and up the rear seat riser to the point where the carpet meets the rear seat cushion. It's best to document the front and rear sections separately. For a standard sedan, the front section often measures around 1,200mm to 1,500mm, while the rear might add another 1,000mm depending on the cabin length. Recording these as distinct figures helps when you're aligning the material during the actual install.
Measuring the Transverse Path (Side to Side)
Standard tape measures struggle with the steep curves of a transmission tunnel. This is where the "String Method" becomes your best friend. Lay a piece of heavy string from the left door sill, over the tunnel, and across to the right door sill. Mark the string at the sills, then lay it flat to get an accurate width. Understanding Car Carpet Measurement: Why Precision Matters because a flat measurement across the tunnel could leave you 50mm to 100mm short on each side.
You must measure the width at three distinct points:
- The front footwells (near the kick panels)
- The B-pillars (the widest point of the cabin)
- The rear footwells (just before the seat riser)
Use the widest of these three measurements as your base width for ordering material.
Calculating the Safety Margin
Once you have your total length and width, add a 10-15% safety margin to the final dimensions. This isn't just a suggestion; it's a requirement for a successful DIY job. This extra material allows for trimming around seat tracks, gear shifters, and seatbelt anchors. If you're working with a budget of A$200 to A$500 for materials, spending an extra A$30 on a slightly larger roll is much cheaper than buying a whole new kit because you trimmed 10mm too much near the door sill. If you're unsure about your specific vehicle's needs, talk to us; we'll be glad to assist you with our 40 years of pattern expertise.
Accounting for Contours: Transmission Tunnels and Kick Panels
Learning how to measure for car carpet accurately means accounting for every rise and fall in the floor pan. The floor isn't a flat surface; it's a complex landscape of steel. If you miss the vertical rise of a transmission tunnel or the curve of a wheel arch, you'll end up with a "floating" carpet that doesn't sit flush against the metal. This creates air pockets that lead to premature wear and a poor aesthetic finish.
The Transmission Tunnel Challenge
The transmission tunnel is the most common source of measurement error. In rear-wheel drive vehicles or 4x4s like a Nissan Patrol or Toyota HiLux, these tunnels are substantial. A high tunnel can require 25% to 35% more material than a vehicle with a flat floor. Use a flexible tape measure to follow the exact contour of the hump from the driver's side floor, up over the peak, and down to the passenger side. Don't pull the tape tight; let it rest in the dips.
- Measure the height: Find the tallest point of the tunnel, usually near the gear shifter or handbrake.
- Account for hardware: Add 45mm of clearance around gear shifters to allow for precise trimming once the carpet is laid.
- Don't rely on stretch: Most quality automotive carpets only offer 3% to 5% flexibility before the backing deforms. Precise measurement is always better than trying to force a fit.
Kick Panels and Pillar Wraps
When you're figuring out how to measure for car carpet, don't stop at the edge of the floor. You must account for the "tuck-in" factor. This is the extra material required to slide under plastic scuff plates and kick panels for a professional finish. Without this buffer, the carpet will pull away from the edges as soon as someone steps into the vehicle.
- Scuff Plates: Add 60mm to 80mm of width on both the left and right sides. This ensures the carpet stays trapped securely under the door trim.
- Kick Panels: If you're carpeting up the side walls, measure from the floor-to-wall junction up to your desired height, typically 150mm to 200mm.
- Wheel Arches: For vans or wagons, treat wheel arches as domes. Measure the vertical height and the semi-circle circumference. 40 years of experience shows that these areas require the most patience during the measurement phase.
If these complex shapes feel daunting, we can take the guesswork out of the process. Tru-Fit has spent decades perfecting patterns for thousands of Australian vehicle models. Find a pre-moulded carpet for your vehicle that is already shaped to fit these contours perfectly.
Choosing Between Custom Moulded Carpet vs. Bulk Rolls
Deciding between a bulk roll and a pre-moulded kit depends entirely on your vehicle type and your patience for trimming. Bulk rolls are the standard choice for unique custom builds, such as chopped hot rods or stretched limousines, where no factory floor pan exists. For almost every other project, a moulded kit is the smarter investment. While learning how to measure for car carpet is a great skill, using a flat roll on a complex floor pan often results in "tunnel bridging" or unsightly bunching in the footwells.
Flat carpet doesn't naturally want to curve around a transmission tunnel. To make it fit, you have to cut relief slits and glue sections together, which creates seams that eventually pull apart. A moulded kit removes this frustration. It's designed to drop straight in, hugging every ridge and dip in the steel floor. It saves hours of labor. It looks better. It lasts longer.
Why Moulded is Often Better
Moulded carpets are heat-pressed using heavy-duty dies that mirror the exact floor pan of your specific make and model. This process gives the carpet a permanent 3D shape. You don't need to stress over complex contour factors because the carpet already "remembers" the shape of the floor. Most of our premium ranges feature a polyurethane backing. This material is far superior to standard latex because it's waterproof and incredibly durable. It ensures the carpet won't lose its shape or sag even after years of heavy boots and cabin heat.
- OE Finish: Achieves a professional look that matches original equipment standards.
- No Bridging: The carpet sits flush against the metal, preventing air gaps.
- Simplified Install: Focus on trimming the outer edges rather than fighting the floor's shape.
The Tru-Fit Advantage in Pakenham
Tru-Fit has been a staple of the Australian automotive industry for more than 40 years. Based in Pakenham, we've accumulated a massive library of patterns covering everything from vintage Holdens and Fords to modern 4x4s and Japanese imports. This experience means you don't have to worry about how to measure for car carpet accurately on your own. Our library of moulds does the heavy lifting for you.
Our team includes acoustic and textile engineers who understand how floor coverings impact cabin noise and heat. We don't just sell carpet; we provide the technical expertise to ensure your DIY project succeeds the first time. You can browse our range of custom moulded carpets here to find the perfect match for your ride. If you're working on a rare build, our staff is ready to assist with specific measurements and advice to get the fitment right.
Start Your Interior Transformation Today
Getting your car interior right starts with accurate dimensions. You've learned that measuring twice saves you from wasting A$100s on ruined materials. Focus on those tricky transmission tunnels and kick panels to ensure your new floor follows every curve of the chassis. While bulk rolls offer a DIY challenge, custom moulded options remove the guesswork entirely. Learning how to measure for car carpet gives you the confidence to tackle any restoration project with professional results.
Of course, getting the fit right is only half the battle; keeping that new carpet pristine is the next step. For professional cleaning that handles everything from automotive upholstery to household flooring, services from specialists like JJs Carpet & Tile Cleaning can help maintain that factory-fresh look long after your project is complete.
At Tru-Fit Automotive, we've been Australian made and owned for over 40 years. Our products aren't just generic covers; they're approved by acoustic and textile engineers to ensure your cabin stays quiet and comfortable. We maintain a huge range of patterns for both classic and modern vehicles, so you don't have to settle for a near-miss fit. Trust the experts who've been perfecting vehicle floors since the early 1980s.
Shop Custom Moulded Car Carpets at Tru-Fit Automotive
Your vehicle's floor is the foundation of its comfort. Take that final step today and give your ride the finish it deserves.
Frequently Asked Questions
Do I need to remove my seats to measure for car carpet?
You must remove the seats to get an accurate measurement of the floor pan's contours. Leaving them in hides roughly 30% of the floor surface and prevents you from seeing where the carpet needs to tuck under the side trim. Tru-Fit’s 40 years of industry experience shows that knowing the exact seat bolt locations is critical for a professional finish. It’s the only way to ensure your new flooring fits perfectly without bunching.
How much extra carpet should I order for a standard sedan?
You should order a minimum of 15% to 20% extra material beyond your base measurements. For a standard Australian sedan like a Holden Commodore or Ford Falcon, this usually means adding an extra 500mm to the total length. This safety margin accounts for the vertical rises over the transmission tunnel. It also provides the 50mm overlap required at the door sills to ensure the carpet stays secure under the scuff plates.
Can I use a standard metal tape measure for my car floor?
No, a standard metal tape measure is too rigid to follow the complex curves and dips of a vehicle floor. Use a flexible fiberglass tailor's tape or a length of string that you can later measure against a ruler. Using a rigid tape can result in underestimating the required material by as much as 150mm. This happens because the metal "shortcuts" the deep valleys of the floor pan rather than hugging the metal surface.
What is the best way to measure the transmission tunnel hump?
The most accurate method is the contour trace technique using a flexible measuring tape. Start at the flat section of the driver's side floor, run the tape up and over the highest point of the tunnel; then finish on the passenger side floor. This measurement is vital when learning how to measure for car carpet because the hump can add 300mm to 450mm of width compared to a flat, straight line measurement.
Does the thickness of my underlay affect my carpet measurements?
Yes, a standard 10mm acoustic underlay will slightly increase the required surface area of your carpet. While it doesn't change the floor's steel dimensions, it lifts the carpet slightly. This means you’ll need roughly 5mm to 10mm of extra length at every vertical transition or corner. Tru-Fit recommends measuring with your underlay already glued in place. This ensures the final carpet fit isn't too tight or prone to pulling away from the corners.
What should I do if my car model isn't listed in a standard catalogue?
You’ll need to provide a custom template or detailed dimensions to a specialist manufacturer. Since 1984, we’ve accumulated a massive range of patterns, but for rare imports or custom builds, we require a 1:1 paper template. Provide the maximum length and width plus a 200mm buffer. This extra material allows for precise trimming during the DIY installation process, ensuring you don't end up short on the edges.
Is it better to buy carpet by the metre or a pre-cut kit?
A pre-cut, moulded kit is superior for 95% of restoration projects because it's heat-pressed to fit your specific floor pan. Buying by the metre is cheaper, often costing around A$45 to A$60 per lineal metre; however, it requires advanced heat-gun skills to remove wrinkles. Moulded carpets save approximately 4 to 6 hours of labor during the fitting process. They provide a factory-standard look that flat carpet simply cannot replicate.
How do I measure for a boot or cargo area carpet?
Measure the widest and longest points of the boot floor, then add 100mm to each side for trimming. When figuring out how to measure for car carpet in a cargo area, don't forget to account for wheel arches. If the carpet needs to wrap over the arches, measure the vertical height and the circumference of the arch. This ensures you have enough square meterage to cover the entire area without unsightly gaps or joins.